Scenario(s):
You have one or more of the following problems to solve;
- You are an iGaming provider, that needs quickly interchangeable domains in countries like Indonesia to work.
- You need an additional domain to hit your existing HTTPS target, but can’t run multiple SSL certs.
- You need to map a call to a direct port on the target, yet, still use CF functionality without the need for custom ports?
- You want cheaper SSL termination for a whole host of endpoint domains leading to a single target?
- any other similar case or need.
You need:
- An easily configurable Cloudflare worker domain proxy.
- A worker path setup on the domain.
Here is the step by step solution to the problem:
1) Create the CF worker and name it.
addEventListener('fetch', event => {
    event.respondWith(handleRequest(event.request))
})

async function handleRequest(request) {
    // Define the subdomain to port and domain mapping
    const subdomainPorts = {
        'script-name':   { port: '443',  domain: 'realtarget.com' },
        'subdomain1':    { port: '443',  domain: 'realtarget.com' },
        'subdomain2':    { port: '1201', domain: 'realtarget.com' },
         ...
        'subdomain9':   { port: '1209', domain: 'realtarget.com' },
    };

    // Get the URL of the incoming request
    const url = new URL(request.url);
    url.protocol = 'https:' ; // Ensure HTTPS on target.
    url.port = '443'; // Default to standard HTTPS port if not found

    // Break the hostname into parts
    const hostnameParts = url.hostname.split('.');

    // Assume the first part of the hostname is the first subdomain
    let firstSubdomain = hostnameParts[0];

    // Check if the first subdomain is in the subdomainPorts mapping
    if (firstSubdomain in subdomainPorts) {
        // Construct new hostname using the first subdomain and target domain
        url.hostname = `${firstSubdomain}.${subdomainPorts[firstSubdomain].domain}`;
        url.port = subdomainPorts[firstSubdomain].port;
    } else {
        // Handle cases where subdomain is not defined in the mapping - default domain or handle as needed
        url.hostname = firstSubdomain + '.realtarget.com'; // Default domain if subdomain is not found
    }

    // Disable the line if you don't want logging.
    console.log(JSON.stringify(url)) ;

    // Create a new request by cloning the original request to preserve all headers, method, body, etc.
    const newRequest = new Request(url, request);
    // Fetch the response from the new URL
    const response = await fetch(newRequest);
    // Return the response to the client
    return response;
}
2) On the domain DNS settings:
- Make sure the domain (realtarget.com) itself has a A record going somewhere.
- Add a CNAME for each of the subdomains, pointing to the domain target.
Ie: subdomain1 IN CNAME realtarget.com
3) Caching for targets:
Under “Caching” –> “Configuration”, Set the caching level to “Standard”.
4) Setting up the worker path:
Under “Workers Routes”, click create “Add route”
and enter *.<newdomain.com>/* as the capture path, and select your worker to handle it.
Done!
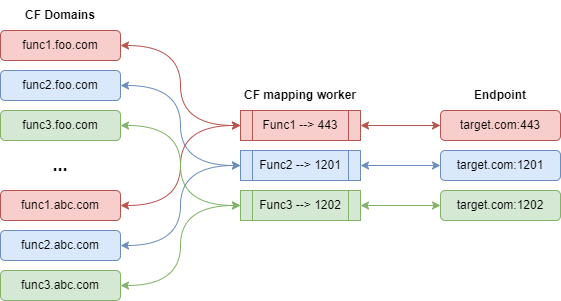
What will happen next when you use your new shiny domain “foo.com”, is:
The client types in the new shiny domain https://subdomain1.foo.com/path?args…
- The script will strip off everything after the first subdomain (subdomain1).
- It will replace the domain with realtarget.com, and map the port to 1201, effectively making
https://subdomain1.foo.com/path?args… appear as:
https://subdomain1.realtarget.com:1201/path?args… keeping all the headers, body, arguments and whatnot as is, making both client and the final target happy,
and you only need a single certificate for the target host, that can even be a long-life self-signed certificate,
using the CF as the certificate front.
or, in a picture (a drawio diagram).

Enjoy!

